Employee Master
The Employee Master is where you enter new employees or change details for existing ones.

- Active vs. Discharged: The summary shows total employees, active employees (which count toward your license), and discharged employees. View discharged staff by checking the 'Discharged' box to retain historical data without processing new transactions.
- Compulsory Fields: There are 15 required fields marked with a red asterisk across the primary tabs (e.g., Employee Code, Surname, Gender, National ID, Paypoint, Department, Rate of Pay, etc.). These must be completed to save a new record.
- Quick Access: Use the 'Payslip Input' and 'Tax Display' buttons on the main screen to jump directly to those specific reports for the highlighted employee.
Importing Employee Master Details
The quickest and easiest way to enter Employee Master details is to import data from the payroll system previously used. If it is possible to import records, see Importing Employee Data first and then come back to this section to check whether the import needs to be supplemented manually.
Entering a New Employee
Go to the 'Edit', then 'Employee Master' menu options and then from the table of 'Employee Master Records' press 'Insert'. Then enter employee details in each of the fields mentioned in the first tab, the Personal Tab, and each of the other tabs.
Personal 1 Tab
Personal 1
The Personal 1 Tab is the default screen when opening a master record.
- Contains core compulsory fields marked with a red asterisk.
- Photograph: Upload an employee photo by clicking the ellipsis button next to 'Clear' in the bottom right corner to browse your local files.
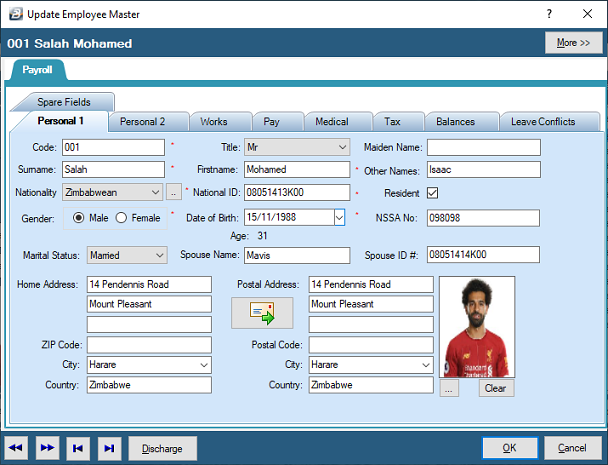
| Field | Description |
|---|---|
| Code | A unique employee number should be allocated to each individual on the payroll. Normally the number is automatically generated if the Automatic Employee Code feature has been activated under Global Defaults. |
| Title | Use the drop-down menu to select the title of the individual. |
| Maiden Name | Enter the maiden name of the employee, if applicable. |
| Surname | Enter the surname of the employee. |
| First Name | Enter the first name of the employee. |
| Other Names | Enter the other name(s) of the employee. |
| Nationality | Use the drop-down menu to select the nationality of the employee. |
| National ID | Enter the employee's National Identification Number. Belina Payroll has a built-in security check of National ID numbers to prevent duplication. This feature can be turned off under the Global Defaults menu. |
| Resident | Use the checkbox to indicate whether the employee is a resident. |
| Gender | Use the radio button to select the gender of the employee. |
| Date of Birth | Enter the employee's date of birth. This field is used to calculate the employee's age, which affects the elderly credit in the tax calculation and whether NSSA contributions should be deducted from older employees. |
| NSSA No. | Enter the NSSA number for the employee. This appears on NSSA reports. |
| Marital Status | Use the drop-down menu to select the marital status of the employee. |
| Home Address | Enter the home address of the employee. |
| Postal Address | Enter the postal address of the employee. If this is the same as the Home Address, press the envelope-and-arrow icon button to copy the details from Home Address to Postal Address. |
| Photo Ellipsis | Press the ellipsis button to browse files and folders on the computer for the employee photograph. |
Personal 2 Tab
Personal 2
The Personal 2 Tab contains entirely optional information. None of the fields here are essential for running your payroll. Complete them only if tracking this additional HR information adds value to your organization.
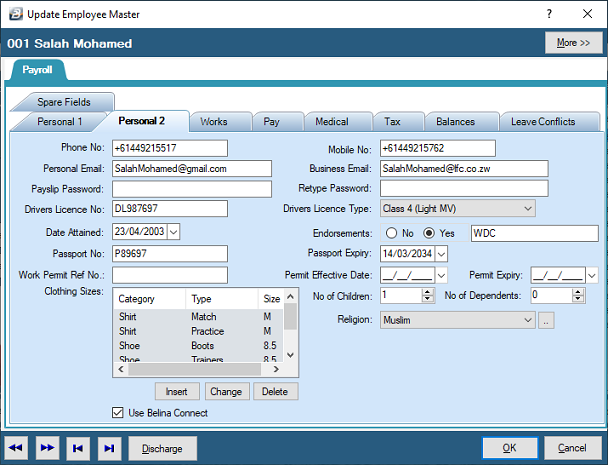
| Field | Description |
|---|---|
| Phone No. | Enter the employee's personal telephone number. |
| Mobile No. | Enter the employee's mobile number. This may be used as part of the employee's login for Belina Connect. |
| Personal Email | Enter the employee's personal email address. This may be used as part of the employee's login for Belina Connect. |
| Business Email | Enter the employee's business email address. This may be used as part of the employee's login for Belina Connect. |
| Payslip Password | Enter the password used to open PDF payslips emailed to the employee. If left blank, the system uses the Employee Code as the default password. |
| Retype Password | Confirm the password used to open PDF payslips emailed to the employee. |
| Drivers Licence No. | Enter the employee's driving licence number (a scanned copy may be uploaded under Documents). |
| Drivers Licence Type | Enter the class(es) of licence the employee holds. |
| Date Attained | Enter the date the driving licence was issued. |
| Endorsements | Enter any endorsements listed on the licence. |
| Passport No. | Enter the employee's passport number (a scanned copy may be uploaded under Documents). |
| Passport Expiry | Enter the expiry date of the employee's passport. |
| Work Permit Ref. No. | Enter the employee's work permit reference number, if applicable. |
| Permit Effective Date | Enter the effective date of the employee's work permit. |
| Permit Expiry | Enter the expiry date of the employee's work permit. |
| Clothing Sizes | Enter clothing sizes for any clothing issued by the organization. |
| No. of Children | Enter the number of children the employee has. |
| No. of Dependents | Enter the number of dependents the employee has. |
| Religion | Enter the employee's religion. This may help in understanding religious holidays and other observances. |
| Use Belina Connect | Tick if the employee is to be given access to the Belina Connect module. |
Works Tab
Works
The Works Tab holds essential employment and departmental information. Like Personal 1, it contains compulsory fields marked with a red asterisk that must be filled before proceeding.

| Field | Description |
|---|---|
| Engagement Date | Enter the employee's date of engagement (DD/MM/YYYY). Printed on P6 forms and the ITF16 form, and used to calculate length of service. Use the ellipsis button to bring up a calendar. |
| Retirement Date | Enter the employee's scheduled date of retirement (DD/MM/YYYY). |
| Occupation | Enter a valid Occupation for the employee, or press the ellipsis button to view, add, modify, or delete the list of Occupations. This appears on the P6. |
| Position | The position in the organizational chart. |
| Department | Enter a valid Department, or press the ellipsis button to view, add, modify, or delete the list of Departments. |
| Cost Centre | Enter a valid Cost Centre, or press the ellipsis button to view, add, modify, or delete the list of Cost Centres. This becomes the default Cost Centre when processing batch or hourly input for cost accumulations. |
| Paypoint | Enter a valid Paypoint, or press the ellipsis button to view, add, modify, or delete the list of Paypoints. |
| Grade | Enter a valid Grade, or press the ellipsis button to view, add, modify, or delete the list of Grades. |
| NEC Grade | Used for organizations using NEC grading. Enter a valid NEC Grade, or press the ellipsis button to view, add, modify, or delete the list of NEC Grades. |
| NEC No. | Enter the employee's NEC number, shown on NEC reports. The NEC deduction value is set up under Transaction Codes. |
| NEC Leave Entitlement | If the employee has a leave entitlement deviating from the standard default value, this can be set up under NEC, even if the employee does not contribute to NEC. This makes it easier to identify and group affected employees in reports and to change values for the group. |
| Leave Entitlement | Enter the annual leave entitlement. Each period, Belina Payroll automatically accrues the leave days due for that period (annual leave entitlement, set up under Global Defaults, divided by the number of payroll periods in the year). The Labour Act minimum leave entitlement is 30 days per annum. |
| Maximum Leave Allowed | Enter the maximum leave balance allowed by the organization. Excess leave can optionally be set up to be paid as CILL. |
| Other Leave Entitlement | Enter another leave entitlement that may apply to the individual. |
| Trade Union No. | Enter the employee's Trade Union number, shown on the Trade Union Report. The trade union deduction value is set up under Transaction Codes. |
| Group Life Assurance No. | Enter the Group Life Assurance number for the individual, if applicable. |
| Time Clocking No. | Used by organizations using computerized time recording systems. Enter the employee's time recording reference number to facilitate data import. |
| Industry | Set up which Industry the employee works under — a grouping of employees with non-standard working hours, e.g. security guards under a different NEC, or employees working mornings only. |
| Pensions | An employee may contribute to more than one pension scheme. Set up any number of schemes the employee contributes to, detailing the scheme name, date joined, and pension number. |
| Employment Type | Largely used by the ZIMSTAT Quarterly Employment Inquiry and other reports to separate Full-time, Contract, Part-time, Casual, Seasonal, and Cadetship employment categories. |
| Discharge Date | Date of discharge or suspension. Entering a date tells the system the individual is not to be processed after that date. On the Employee Master screen: f = discharge in a future period, d = last period transactions are processed, D = employee has left and no transactions are processed. |
| Reason | Enter the reason for discharge for future reference. Press the ellipsis button to see the list of Reasons set up under the Edit menu and select the appropriate one. |
| Immediate | Tick to indicate the discharge is immediate and all transactions for the individual for the current period should be removed. |
| Director | Indicate whether the employee is a company director. Required for the ITF16, where company directors historically had to be printed separately. |
| Pensioner | Indicate whether the employee is a pensioner. Required for the ITF16, where pensioners historically had to be printed separately. |
| Absent Employee | If an employee is marked Absent, pay for that individual is suspended. Transactions in Payslip Input are removed and no payment is made at period end. Removing the tick automatically re-inserts the transactions that were in Payslip Input. Note: Any employee suspended and not receiving payment in a period should be removed from the FDS tax method and put on the PAYE method. |
| Suspension Details | Use where an employee is absent or suspended without pay but is not being discharged. A pop-up lets you type in a reason. Transactions on Payslip Input are removed but automatically re-inserted when the employee returns. |
| E/D Ref | Add the employee's account number to individual transactions made to third parties, e.g. an employee's Doves account. Employees may have various credit and other accounts, each with its own account number; Belina PayrollHR records these and includes them in the Transactions Report (found under View > Transactions > Report), which summarizes employee deductions and can accompany a remittance. Steps: 1) Press the E/D Ref button on the Works tab. 2) Press Insert to select the applicable Transaction Code. 3) Enter the employee's reference number for that Transaction Code. |
| G/L Codes | Add the employee's general ledger account (or sub-account) number to individual internal transaction codes where transactions are being accumulated. |
| Employment History | Displays a table highlighting changes made to the employee master record for grade, NEC grade, department, cost centre, paypoint, and more. |
Pay Tab
Pay
The Pay Tab dictates how the employee receives their net pay.
- Select the preferred payment method: Bank Transfer, Cash, or Cheque.
- You can also temporarily suspend payment to a specific bank account from this screen.

| Field | Description |
|---|---|
| Payment Method | The method by which employees are paid:• Cash: Net pay is included in the coinage breakdown.• Cheque: Net pay is included in the cheque print run, showing Payee Name and amount.• Savings: Net pay is paid by a combination of cash and transfer to savings.• Transfer: Net pay is added to the bank transfer listing and EDI file for electronic transfer. |
| Payment Basis | The basis for the rate of pay:• Period: Enter the weekly or monthly rate (hourly/daily rates are computed automatically using the Period Table).• Daily: Enter the daily rate (hourly/period rates are computed automatically).• Hourly: Enter the hourly rate (daily/period rates are computed automatically). |
| Base Rate On | Determines if the individual's rate of pay is based on the Employee Masterfile, the Internal Grade, or the NEC Grade. |
| Rate of Pay | Use the ellipsis button to enter the pay rate(s). Portions can be paid in multiple currencies.• Period Payroll: Enter pay amount(s) per period.• Daily Payroll: Enter pay amount(s) per day.• Hourly Payroll: Enter pay amount(s) per hour. |
| Payslip Currency Type | The currency in which the employee is paid (allows for multi-currency payrolls). |
| Rate to Show on Payslip | Reflects the period, daily, or hourly rate of pay on a custom payslip. |
| Bank Details | Used if the Payment Method is 'Transfer'. Allows setting up multiple bank accounts with percentage allocations (must equal 100%). Can also handle transfers for specific deduction amounts. |
| Cheque Payee Name | The exact name to be printed on the cheque (if Payment Method is 'Cheque'). |
| Average Hours/Period | The average number of hours per period for the year (used to process hourly rates like overtime). |
| Average Days/Period | The average number of days per period for the year (used to process daily rates like leave or CILL). |
| Pay Amount/Day | Automatically calculated from the rate of pay and the average days per period. |
| Pay Amount/Hour | Automatically calculated from the rate of pay and the average hours per period. |
| Statistics | Shows all historical changes to an employee's rate of pay or grade over previous periods. |
| Last Applied | Shows the period, daily, and hourly rates that applied in a selected historical period. |
Medical Tab
Medical

| Field | Description |
|---|---|
| Medical Aid Membership | Indicate, for each employee, what contributions are to be made for self, spouse, children, and dependants. If the medical aid schemes have not already been set up under Medical Aid Setup, it may be necessary to set up the Medical Aid organizations, schemes, and types of membership available. The system picks up the rates entered for the scheme and membership type. |
| Blood Group | Enter the employee's blood group, if known and to be recorded. |
| Health Status | Use, or amend, the default list of Health Status values to suit your requirements. |
| Height | Enter the height of the employee in metres. |
| Weight | Enter the weight of the employee in kilograms. |
| BMI | Automatically computed from the height and weight entered. |
| Diet/Health Conditions | Use, or amend, the default list of Diet/Health Conditions to suit your organization. The default list is a guideline that can be expanded to suit individual requirements. |
| Doctors | Enter the name and contact details of the employee's doctors. |
Tax Tab
Tax
The Tax Tab stores specific taxation parameters for the individual.
- Suspended/Re-engaged Employees: Any employee suspended for one or more periods or re-engaged during the tax year should be removed from the default FDS method of calculating tax and placed on the non-FDS method.
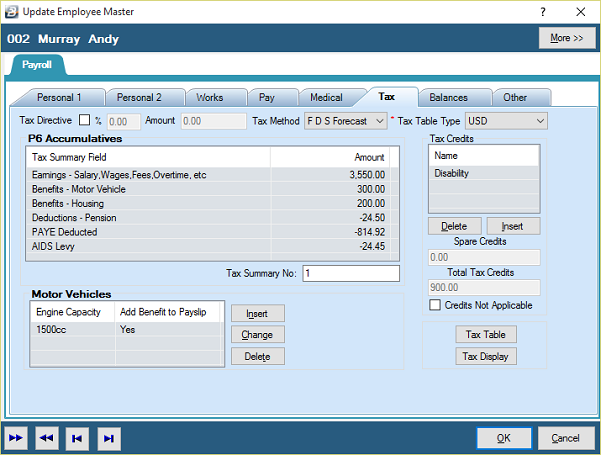
| Field | Description |
|---|---|
| Tax Directive | Turns off automatic PAYE computation to allow manual entry of a percentage or amount. Useful for new payrolls when capturing previously computed data. (Can be applied to all employees at once via Data > Bulk Routines > Tax Directive Convert). |
| Tax Method | FDS: Projects YTD income (Forecast or Average method) to estimate annual income, auto-correcting over/under-deductions so year-end balances exactly. Only for employees on payroll since the start of the tax year.Non-FDS: Uses only current period infomation. Used for mid-year joiners or suspended employees. System auto-converts these to FDS during year-end procedures. |
| P6 Accumulatives | A summary of the P6 details accumulated for the employee in the year to date. |
| Tax Credits | Insert the disability credits (e.g., Blind and Disability) that the employee is entitled to receive. |
| Motor Vehicles | Press 'Insert' to select the engine capacity of a company vehicle used by the employee to automatically calculate the deemed taxable benefit. |
| Tax Identification No. | Enter the employee's Tax Identification Number (TIN). |
| Tax Table Button | Displays the current Tax Table setup. |
| Tax Display Button | Displays the current Tax Display report. |
| Spare Credits | Used in rare circumstances where an employee is entitled to a credit greater than the maximum of two disability credits allowed. |
| Total Tax Credits | Shows the total value of the tax credits the employee is currently eligible for. |
Balances Tab
Balances
The Balances Tab is a read-only summary that provides a quick, at-a-glance view of the employee's current leave entitlements and outstanding loan balances.

| Field | Description |
|---|---|
| Annual Leave | The current annual leave balance. |
| Leave Bank | The balance in the leave bank generally represents overtime hours coming through from Belina Time Control that are not paid out as overtime. There is also a facility for tertiary institutions whereby, at a cut-off date in the year, the balance of leave is moved to leave bank. |
| Other Leave Table | Shows leave transactions processed for each leave type:Previous — total days processed in prior periods of the year to date; Current — days processed in the current period; Total — total days processed in the year to date; Maximum — total days of leave allowed where a maximum applies, e.g. study leave; Balance — days remaining from the maximum allowed. |
| Loans Table | Shows details of current loan balances outstanding. |
| Savings Balance | Shows the savings balance accumulated by an employee using the Belina Savings facility. |
| Total Loans | The total value of loans outstanding for the employee. |
Leave Conflicts Tab
Leave Conflicts
The Leave Conflicts Tab prevents critical staff shortages by restricting simultaneous absences.
- Click 'Insert' to add the names of colleagues who cannot be on leave at the same time as this employee.
- Use the checkboxes to specify exactly which leave types trigger the conflict warning.

Spare Fields Tab
Spare Fields
The Spare Fields Tab offers customizable data entry points for unique organizational requirements.
- Customization: Go to 'Setup' > 'Global Defaults' > 'Employee Master' > 'Other' to rename these fields.
- Usage: These fields integrate perfectly with specific Transaction Codes (like Mileage) to perform background calculations using custom multipliers or unit values imported from external spreadsheets.

Memberships
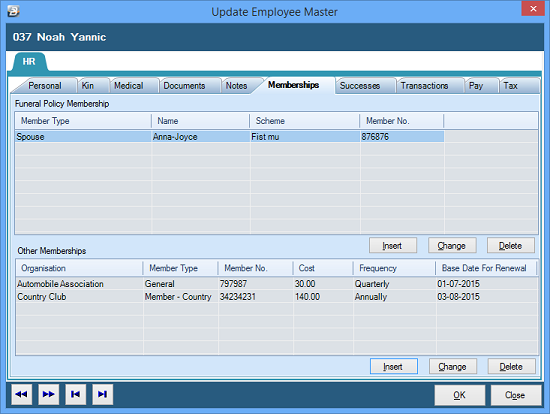
Funeral Policy Membership
Setup for each employee the people being covered by the Funeral Policy. To do this go the Employee Master record for the member, then select the 'Memberships' tab. This tab is visible under "More>>" button which is located on the top right hand side of the Employee Master screen.


Click Insert and proceed to enter the Funeral policy memberships for the employee.
Other Memberships
To allow the system to automatically deduct an amount for other membership contributions, you may add the memberships under the Other Memberships section
Was this page helpful?